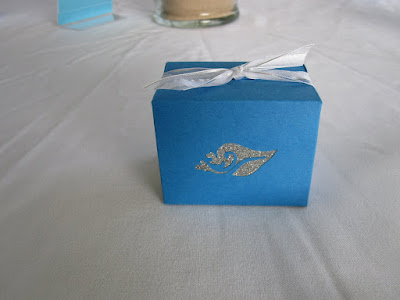
Here are the favors from my son's wedding. We made chocolate covered pretzels to put in them. We covered the pretzels with milk chocolate almond bark, then drizzled white chocolate over them. We placed them in clear cello bags and tied them with curling ribbon, then placed them in the boxes. We added a tag to the back of the box that said "we tied the knot", and tied a satin ribbon around the box. The box only needs one strip of adhesive. We made 200 of these!!! They were a huge hit-there wasn't a pretzel left after the wedding. People were actually looking for any "extra" boxes!
Wednesday, June 30, 2010
Thursday, June 24, 2010
Creative Inspirations Paints
Our challenge this week was to make a project using "beachy" colors. I printed a colored beach scene, then went over the colors with matching paints. I used autumn wheat, winter frost, aquamarine, onyx, and my favorite, fairy dust! Check out the other designer's projects at Creative Inspirations Paints!
Tuesday, June 22, 2010
Wedding Car Vinyl
Friday, June 18, 2010
Prom Garters
Tonight is my daughters Senior Prom, so I have been making garters for her and a few friends. I was surprised to learn that prom garters are not a tradition everywhere, just in our part of the country. I would be interested to know if they are a tradition where you live. Garters were part of prom for me, so the tradition has been around here for a long time!
Thursday, June 17, 2010
Wedding Invitation
This is the wedding invitation for my son's wedding. We made 95 of these. My daughter-in-law likes things clean and simple-no foof!
Wednesday, June 16, 2010
Wedding card box
My project for today is a cardbox for your reception.
It cost about $20 to make, and I am thrilled with how it tuned out! The photos can also be changed out, so it is a great keepsake. I've had a few requests to make them as Christmas gifts! This was a beach themed wedding, but it could easily be decorated to match your wedding.
The bottom and top were cut from 1/4" plywood. Then we attached a lazy Susan piece from Lowes.
Then I spray painted the whole thing white.
For the lid we cut a slot for the cards with a jigsaw, gave it a coat of paint, coated the lid with spray adhesive, and covered it with sand. Then shells were hot glued on top.
The letters were cut from black vinyl with my cricut and scal 2 using the monotype corsiva font, and applied to the outside of the frames.
I hope you enjoyed todays project!
Tuesday, June 15, 2010
Bulletin Board
This is the bulletin board in the foyer of our church. People don't usually do anything to it for weddings, but I couldn't resist. The guest book was on the counter in front of the board, and the sanctuary entrance was just to the right, so it really is a focal point as you walk in.
It was quick and easy. I cu the words with scal 2 and my cricut out of black contact paper. The photo I printed myself, using paer called "super B" size-its 13 x 19!!!! The quality was amazing. Then I just used netting and ribbon around the edges.
It was quick and easy. I cu the words with scal 2 and my cricut out of black contact paper. The photo I printed myself, using paer called "super B" size-its 13 x 19!!!! The quality was amazing. Then I just used netting and ribbon around the edges.
Monday, June 14, 2010
My Son's Wedding
No, I didn't fall off the face of the earth, it just appears as if I have! The wedding did take place June 5, and it was a wonderful day. I thought life would slow down a little, but it is crazier than ever. If I can make it until July 2, everything really should get back to normal. (thats my daughters graduation party)
Here is the happy couple. I am still waiting on our digital photos, so this was all I could scrounge up. I didn't bother with my camera that day, I just wanted to enjoy everything. As soon as I get some good pictures Iwill post them. I will also start posting thr things we made.
Thursday, June 10, 2010
Creative Inspirations Paints
Our challenge this week was to use the paint on acrylic or acetate. I found this challenging since I cannot freehand paint anything! I ended up stamping my image on the acrylic frame and heat embossed it. Then I just filled in my image with the paint.
My daughter, who graduates in a couple of weeks, had an end of the
year AP Biology project. Each year the members of the class pick a bird and do
a large project on it. When they are done they line the main hallway of the
high school with booths and invite the students from all grades to walk though
their exhibits. Of course my daughter had to pick and ostrich, AND she HAD to
make it life sized!!!!! So we have been doing this for the past few days, along
with my son's wedding which was Saturday. It has been crazy. I posted it
because she did use the paints, and they were on a clear surface. I just wanted
to show that there are many uses for the paints!!! The ostrich eyes are small,
clear vanity light bulbs. She painted them with chocolate and black onyx, and
covered them with crystal effects. They really came out great, as did the rest
of the 6ft bird!!!
Subscribe to:
Comments (Atom)


